
This is going to be a long blog post, but by the end, you will have an Ubuntu environment connected to the NVIDIA GPU Cloud platform, pulling a TensorFlow container and ready to start benchmarking GPU performance.
Let's split this into four phases:
1) Install Ubuntu 18.04 LTS and NVIDIA Graphics Driver
2) Install Docker CE and NVIDIA Docker v 2.0
3) Setup NVIDIA GPU Cloud and pull down GPU optimized docker containers
4) Run the TensorFlow benchmark
It's time to get started!
Phase One: Install Ubuntu 18.04 LTS
Ubuntu website: https://ubuntu.com/download/desktop
Ubuntu has a great tutorial on how to create a bootable USB installer for the Ubuntu Desktop environment, follow it step by step to create your USB installer.
https://tutorials.ubuntu.com/tutorial/try-ubuntu-before-you-install
There’s also a great Ubuntu step-by-step guide by Pradeep Kumar, so in my case, I simply chose the option “Erase Disk and Install Ubuntu” resulting in a clean Ubuntu installation.
https://www.linuxtechi.com/ubuntu-18-04-lts-desktop-installation-guide-screenshots/
Now we need to perform an update. Open a Terminal window, type in the following commands, and enter your password when requested. When you first execute a command start with "sudo" inside your Terminal session, you will need to provide your password because you are making OS level changes to your operating environment.
sudo apt-get update
Once the update process is complete type:
sudo apt-get upgrade -y
sudo apt-get dist-upgrade -y
Your system will need some time to retrieve and install these updates, so this is a good time to grab a cup of coffee, or two! Once the update is complete, reboot the system by entering the following:
sudo reboot
Install the NVIDIA Driver
Open a terminal window and enter the following:
sudo add-apt-repository ppa:graphics-drivers/ppa
sudo apt-get update
Then go to "Software & Update" inside the Desktop
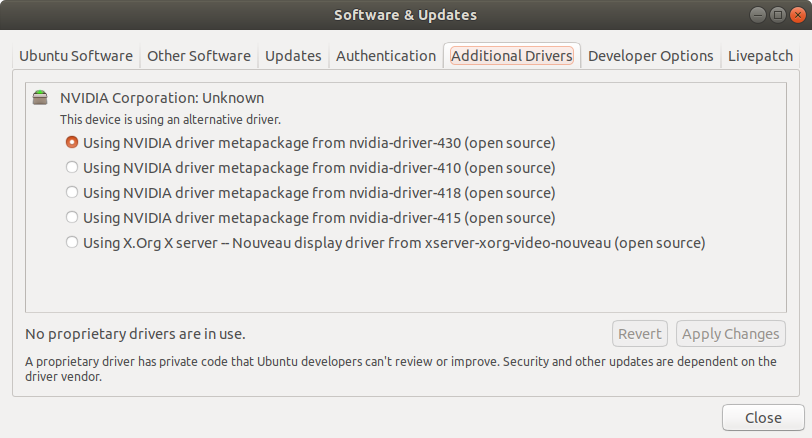
Go to the "Additional Drivers" tab and select the latest NVIDIA driver and click "Apply Changes."
After the driver installation is done, reboot your system.
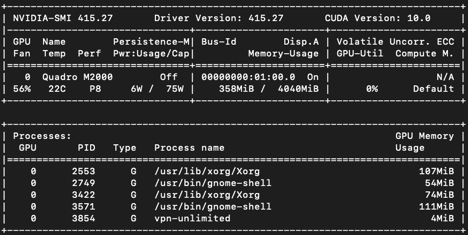
Once you are back to the Ubuntu desktop, open a Terminal window and enter the following to validate the NVIDIA driver installed correctly:
nvidia-smi
This is a typical nvidia-smi result screen:
Phase Two: Install Docker CE and NVIDIA Docker Version 2.0
Docker Website: https://docs.docker.com/install/linux/docker-ce/ubuntu/
One of the challenges Linux presents is dependency management. Frequently, an update to one program will cripple the rest of the system because it updated part of the OS that other programs depended on. This misalignment of file dependency is extremely difficult to diagnose and fix for a Linux novice like myself.
Here is a quick definition directly from Docker website:
"A container is a standard unit of software that packages up code and all its dependencies so the application runs quickly and reliably from one computing environment to another. A Docker container image is a lightweight, standalone, executable package of software that includes everything needed to run an application: code, runtime, system tools, system libraries and settings."
Source: https://www.docker.com/resources/what-container
By using a Docker container, I know that all necessary files are packaged inside and there will not be any file dependency issues.
To install Docker CE, here are the steps according to Docker’s website.
First, install a few programs Docker needs and fingerprint what you need to connect to the Docker server:
sudo apt-get install \
apt-transport-https \
ca-certificates \
curl \
gnupg-agent \
software-properties-common
curl -fsSL https://download.docker.com/linux/ubuntu/gpg | sudo apt-key add -
sudo apt-key fingerprint 0EBFCD88
You should see the following message:
pub rsa4096 2017-02-22 [SCEA]
9DC8 5822 9FC7 DD38 854A E2D8 8D81 803C 0EBF CD88
uid [ unknown] Docker Release (CE deb) <docker@docker.com>
sub rsa4096 2017-02-22 [S]
Here are the commands to install Docker.
sudo add-apt-repository \
"deb [arch=amd64] https://download.docker.com/linux/ubuntu \
$(lsb_release -cs) \
stable"
sudo apt-get update
sudo apt-get install docker-ce docker-ce-cli containerd.io
To make your life easier going forward, so you can run Docker container with using sudo,execute the following but replace “your-user” to your actual Linux username
Execute the following but replace “your-user” to your actual Linux username
sudo usermod -aG docker your-user
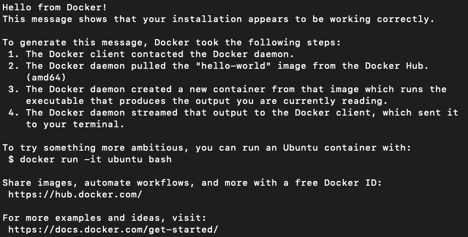
Log off and Log back into Ubuntu, you can test your Docker environment by executing the following inside a Terminal window
docker run hello-world
Install NVIDIA Docker 2
Visit the NV Docker Github page: https://github.com/nvidia/nvidia-docker/wiki/Installation-(version-2.0)
To run the NVIDIA GPU accelerated Docker containers, we also need to also install NVIDIA Docker version 2.0.
Here are the setup steps to ensure Ubuntu knows how to grab and install NVIDIA Docker 2.0:
curl -s -L https://nvidia.github.io/nvidia-docker/gpgkey | \
sudo apt-key add -
distribution=$(. /etc/os-release;echo $ID$VERSION_ID)
curl -s -L https://nvidia.github.io/nvidia-docker/$distribution/nvidia-docker.list | \
sudo tee /etc/apt/sources.list.d/nvidia-docker.list
sudo apt-get update
Once this finishes you can execute the following to install NVIDIA Docker 2.0:
sudo apt-get install nvidia-docker2
sudo pkill -SIGHUP dockerd
When the installation concludes, execute the following to validate.
docker run --runtime=nvidia --rm nvidia/cuda:9.0-base nvidia-smi
A familiar nvidia-smi result should greet you.
Phase Three: Connect to NGC
Now your software environment is ready to connect to NVIDIA GPU Cloud. Please make sure you have an active NGC user account. You can sign up for free by visiting the following link http://ngc.nvidia.com/ and click on “CREATE AN ACCOUNT”
To connect Ubuntu to NGC perform the following steps:
Click “SETUP” on the main NGC screen.
Click “Get API Key”
Click “Generate API Key” icon on the upper right corner.

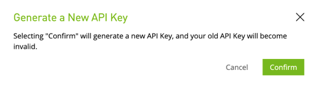
Confirm you wish to generate a new API key
After the new key is generated, go to your Terminal window and follow the instructions to add the API key to your Ubuntu environment
After you are connected to NGC, you can start requesting GPU accelerated containers from the NGC registry, in our case, we are looking for TensorFlow container version 19.05 with Python 3, enter the following inside a Terminal window:
docker pull nvcr.io/nvidia/tensorflow:19.05-py3
Once the process is complete, the container is ready to run.
nvidia-docker run --shm-size=1g --ulimit memlock=-1 --ulimit stack=67108864 -it nvcr.io/nvidia/tensorflow:19.05-py3
Phase Four: Benchmarking
Inside your container, you can navigate to the cnn folder and run the resnet.py Python script:
cd nvidia-examples/cnn
python resnet.py --layers 50 -b 64 --precision fp32
After a little while, you should see the result display on your screen.
Averaging the “Img/sec” numbers will give the average performance for your GPU when training ImageNet using ResNet-50 with 32-bit Floating Point precision.
If you have an RTX (Turing) generation GPUs, you can switch the flag to fp16, which will allow the GPU to process your request using the new Tensor Cores, which should result in improved performance:
python resnet.py --layers 50 -b 64 --precision fp16
Step Epoch Img/sec Loss LR
1 1.0 10.0 7.978 8.949 2.00000
10 10.0 119.9 2.353 3.326 1.62000
20 20.0 291.6 0.012 0.988 1.24469
30 30.0 293.7 0.068 1.046 0.91877
40 40.0 293.4 0.267 1.249 0.64222
50 50.0 292.4 0.659 1.644 0.41506
60 60.0 292.7 0.266 1.255 0.23728
70 70.0 292.3 0.211 1.203 0.10889
80 80.0 292.1 0.371 1.364 0.02988
90 90.0 202.1 0.001 0.995 0.00025
Since this is running inside a Docker container, you are assured the software inside the container is consistent across the runs. This makes it extremely easy to compare results run in the past as well as comparing your results to other people running the same container.
We’re finished! This is is how you can start benchmarking GPUs using Resnet-50 with TensorFlow without having to code the entire ResNet in TensorFlow and securing the massive ImageNet 2012 dataset.
We would love to see your image per second number(s), please post your result(s) in the comment section.
Do you have a great tip to share with the community regarding PNY GPU or Storage products?
Please submit your tip suggestion by visiting the following page. We would love to hear from you:


